Wednesday, May 20, 2009
Best Practices: An Educational Resource For Students with Hearing Loss
- Information about the Ear and Hearing Loss
- Classroom Stratagies Creating an acoustically sound and cohesive learning environment
- Sign Language and Total Communication Comparing ASL and signed English/ The Three Little Pigs in Signed English and Auditory Verbal techniques
- Technology FM system/ Sound Field and Hearing aids
You will also find information on a Cochlear Implant, Information, an Audiogram, Causes of hearing loss and a variety of website links for further exploration of topics.
Tuesday, May 12, 2009
Information on the Ear and Hearing Loss
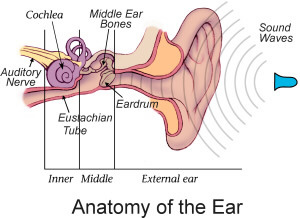 The outer ear is made up of the earlobe and ear canal, the earlobe helps direct sound from the environment into the ear canal and towards the eardrum.
The middle ear is made up of the eardrum and the three tiny bones called ossicles, these three small bones move sound waves from the outer ear to the inner ear. The vibration of the ear drum causes each of the middle ear bones to vibrate in succession, directing sound to the inner ear. The area behind the middle ear is the inner ear, sound vibrations from the middle ear are transmitted to the cochlea.
The cochlea is a bone shaped like a snail’s shell it is filled with fluid and thousands of tiny hair-like nerves. Vibration makes the fluid in the cochlea move, which makes the hair move, the hairs are attached to a bundle of nerves called the Eighth Cranial Nerve this auditory nerve sends messages to the brain to process the sound the brain translates the sound for us to hear.
Types of Hearing Loss
Hearing loss is the partial or extreme loss of a person’s ability to receive information by listening. People can have a varying degree of hearing loss. Hearing loss is usually classified as conductive or sensorineural or mixed which is a combination of both..
Conductive Hearing loss can be acquired or congenital. Hearing loss often occurs with middle ear infection (otitis media) and ostosclerosis (abnormal growth of bony tissue in the middle ear). Many conditions of this type can result from fluid build-up in the middle ear as a result of colds, allergies, a perforated eardrum, impacted earwax, ear canal infection and the absence or malformation of a person's ear canal, middle ear or outer ear. This typically results in one's inability to discern faint sounds, and conversations may sound muffled or distant.
Sensorineual Hearing loss can also be acquired or congenital and is caused by malfunction of the cochlea. Congenital sensorineural hearing impairment may occur due to genetic factors, premature birth, or lack of oxygen at birth. The degree of hearing loss in a child with a sensorineural hearing loss can vary from a mild loss to a profound hearing loss. The most common Sensorineual hearing loss is Prebycusis, which can be described as an age related deafness.
Monday, May 11, 2009
Classroom Strategies
It is important students with hearing loss have a learning environment that is conducive. The following strategies are simple and easy to apply to any classroom.
Seating:
Don't seat this student too close to audio-visual equipment, such as film projectors or air vents in the room. The noise of the motor and fan will drown out the sound of voices in the film, class, etc.
Ensure that the student is paying attention before giving instructions. Make sure that the student has an uninterrupted view of the teacher's face. During discussions, ask questions to make sure the student with the hearing loss understands.
Set up a buddy system. The buddy can repeat your directions, give the hearing impaired student a photocopy of notes taken during films, repeat information coming over the PA system, making sure the hearing impaired student knows about important dates and cancellations. ·
Encourage participation in extracurricular activities.
How to support with Vocabulary Development?
Vocabulary and complex sentence structures are often misunderstood by hard of hearing and deaf students. When they appear not to understand, try:
- Repeating the same words
- Rephrasing
- Simplifying the language
- Pre-teaching new vocabulary before a new unit, particularly in the content areas.
- Using full length sentences. Single words or incomplete phrases may not convey full meaning to someone who is having difficulty hearing what is being said.
The ability to hear the difference in sounds such as a long I in bike vs the short I in milk. The side bar has a website with a variety of different exercises that will enable the student in a fun and interactive way to practice the subtle differences in the sounds. A simple exercise is to have piece of paper with a long (a) on it and an (a) with a cross through it . Making sure to put your hand in front of your mouth, say the word and the student points to the long (a) or the other. Making sure to mix the words up and reward with a token for every one he/she gets right, this turns it into a great game. Most students with hearing loss are very good at reading lips so remember to cover your mouth.
- If your classroom is too noisy here are some simple tips to help make the environment quieter:
- Place some rugs or carpet in the room if there are none.
- Hang window treatments such as curtains or blinds.
- Hang soft materials such as felt or corkboard on the walls.
- Hang soft materials such as flags or student artwork around the room and from the ceiling.
- Turn off noisy equipment when it is not in use.
- Try to keep windows and doors closed when possible.
Replace noisy light fixtures
Sign Language
ASL or American sign language is the most commonly used form of sign language, like any language it does vary. It is a language that uses hands, facial expressions, and other body behaviours to communicate both concrete and abstract ideas; most signs are based on English words, but ASL syntax and grammar are not based on English language.
Signed English is a form of sign language that follows the syntax and grammer of the English language, each word in the English language has a sign. English sign is used to create language for young students that are having difficulty with speech development, signed English will not on it's own result in improved speech, but it should offer a better foundation for a speech training program. Signed English has been proven to increase the information children are receiving in regards to the English language ASL does not offer this same English language development. Once the English language is developed enough to support communication ASL is then adopted or both speech and sign can be used.
Total Communication
Total communication is the bridge that allowed a crossover from an oral-only philosophy to a philosophy that embraced sign language.
TC is a philosophy that will allow flexibility without eliminating any of the options. By using a total approach of speaking and signing, all members of the family, those who are deaf as well as those who are hearing, have continuous access to the communication occurring in their environment.
Auditory Verbal approach and Oral approach
The Auditory-Verbal Approach stresses the importance of intensive auditory training of the hard-of-hearing or deaf student; daily listening activities, consistent use of amplification (hearing-aids) and regular educational programming in integrated school settings. The Oral Approach also stresses the importance of auditory training; however much emphasis is placed on the importance of speech reading and encouraging students and parents to facilitate the development of lipreading skills.
An ASL video website:
http://www.aslpro.com/cgi-bin/aslpro/aslpro.cgi
A website for math signs:
http://www.tsdvideo.org/index.php?lang=English
Signed English video website:
http://www.uiowa.edu/~c003140/Frameset1.html
The Three Little pigs in Signed English
Thursday, May 7, 2009
Technology
Hearing aids today can be grouped under the following categories:

Classroom Sound Field
A classroom sound field pictured above consists of three elements the tower, the microphone and a headset. The purpose is to deliever amplified sound throughout the classroom using the headset (usually worn by the teacher) and the microphone (usually used by the students). the tower is usually placed near the student with a hearing impairment and preferably to the side he or she hears better from. The classroom sound field benefits the entire class not only the students with hearing impairments. To gain the most from the sound field it is important...
- That it is being used, especially the microphone during class discussion
- That the headset and microphone are recharged nightly
- That the volume is correct and a way of testing that (if the person using the equipment can hear themselves through the tower it is to loud

What is an FM Listening System?
An FM system is a wireless system that transmits sound directly from source to the ear. It consists of an FM microphone and one or two FM receivers. The wireless communication system (FM system) has a transmitter, which picks up the voice from the speaker (microphone) and sends it via radio waves (wireless) directly to the tiny radio (FM) receiver, which is connected to the personal hearing instrument. Below is a series of picture and instruction on how to charge and us the FM system.
- To switch on: press and hold the button for two seconds
- To switch off: press and hold the button for two seconds
- The microphone is located on the side of the FM
- Do not cover the microphone with your finger, it effects the sound quality
- To connect to a computer or television attach the small adapter piece to the bottom of the Easy link then connect the audio cable to the audio jack to the labelled plug on the Easy Link or FM
- To charge the Easy Link attach the adapter to the wall adapter, do not charge for more than a 2 day period.


To charge the FM first attach the wall charger to the wall then add the adapter (small black peice) to the bottom of the FM, next attach the wall adapter cord to the left side of the adapter the FM should be charged over night.
The first picture shows how the an FM can be attached to a computer or television to provide audio, with the adapter attached to the bottom of the FM plug the provided cord into the audio slot on the left hand side and the other end of the cord into the audio plug on the computer or t.v. an (A) will appear on the screen of the FM to let you know you are attached.
The second picture above shows you the microphone on the FM it is the black slot along the side this should be free of all interference when being used, when using the FM on a table for a group the FM should be placed as shown.

A Resource Guide to Support Classroom T.A. and Teachers with
Hearing Aid/FM Systems/ Easylink
Always check that the FM and aids are working well, a stethoscope can be used to determine this. Always make sure the tubing is free and clear of any water or condensation.
Speak in a normal tone of voice with the microphone approximately 8 to 10 inches from your mouth. If the microphone has a clip it should be used to avoid the device from dangling and picking up undue noise. Your voice will be amplified, but remember that no hearing aid will allow your student to hear exactly as he would if he/she had no hearing loss.
A personal hearing aid works best within a 15 meters or 50 ft. in side the building and 30 meters or 100 ft. outside a building. Beyond that, other background noise will interfere. It is important to be aware of this range for direct instruction and group activities.